Now all the preparation completed, I finally able to deploy TKG management cluster. The recommended (and easiest) way to do this for the first time is using the installer interface. From the bootstrap machine prepared earlier (https://dy.si/TAg1M72), I type this:
tanzu management-cluster create --ui --browser none --bind 192.168.110.101:8081
- 192.168.110.101 is my bootstrap machine IP Address
- I set the installer interface to be accessible on port 8081
- --browser none to tell the installer not to open browser locally as my bootstrap machine is without GUI
- Open http://192.168.110.101:8081 on a browser with network access to bootstrap machine
- As always, this is the official documentation that I refer to: https://docs.vmware.com/en/VMware-Tanzu-Kubernetes-Grid/1.5/vmware-tanzu-kubernetes-grid-15/GUID-mgmt-clusters-deploy-ui.html
Step 1 - IaaS Provider
This is self-explainable. SSH Public Key is generated in Step 3 in this article https://dy.si/TAg1M72.
Step 2 - Management Cluster Settings
This is self-explainable. I choose Production as I want to add this management cluster to Tanzu Mission Control (Reference: https://docs.vmware.com/en/VMware-Tanzu-Mission-Control/services/tanzumc-concepts/GUID-3AE5F733-7FA7-4B34-8935-C25D41D15EF9.html).
Step 3 - VMware NSX Advanced Load Balancer Settings
All the required information coming from NSX ALB installation here https://dy.si/uTVdS. Note tkg-vip-network is the one used here. Controller CA can be retrieved from NSX ALB web UI, go to Templates > Security > SSL/TLS Certificates, select the certificate you create and click the export icon.
Step 4 - Metadata
I skipped this.
Step 5 - Resources
This is vSphere resources prepared in this article: https://dy.si/VuWvK.
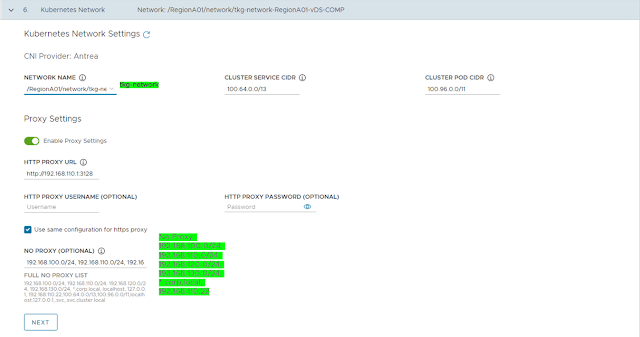
Step 6 - Kubernetes Network
- Kubernetes network is tkg-network explained in TKG network topology (https://dy.si/uTVdS).
- I left cluster service and cluster pod CIDR as default.
- My lab requires proxy. This is also mentioned in the network topology.
Step 7 - Identity Management
I skipped this.
Step 8 - OS Image
This is self-explainable. Select one of the image prepared before (https://dy.si/VuWvK).
Step 9 - CEIP Agreement
Now all parameters has been filled, click Review Configuration and then on the page presented, I scroll to the bottom of the page and can see this.
All seems to good. Click on Export Configuration to retrieve the config.yaml file. Rename with something more meaningful for future reference. Next click Deploy Management Cluster and this is the result.
Installation complete. Yeay!! Time for break and celebrate! Cheers!
Part 4 (this article): Deploy TKG Management Cluster on vSphere


No comments:
Post a Comment